Sera’s Space
Part One
 A (relatively) short and sweet “Hello” from your newest contributor! I’m Sera, based in the UK. I’ve been into music and hi-fi since I was about 11 years old. I’m not your typical audiophile, for a start I bring a bit of estrogen to this hobby which seems to have suffered from a bit of an overdose of testosterone… that said I’m not your average girl either!
I’m also an engineer, I’ve always been interested in physics, electronics, engineering and the way things work and I’ve dedicated my life and career to engineering in one form or another. I graduated from University with a masters degree in Engineering 10 years ago and have worked in various manufacturing companies since.
And I’m a rock/metalhead/goth—again not typical within the audiophile world. Although I have a very varied taste in music, 90% of my collection is what most people would call “shouty stuff” the rest is made up of various pop and electronica from throughout the last 40 years.
I bought my first hi-fi with pocket money that I had saved up, and proceeded to drive my parents’ nuts by playing music far too loud for the small house that we lived in at the time, and things have just progressed from there. I’ve owned innumerable different bits of kit over the last 20 years, in the unending quest for better sound.
Part of that quest has lead me down the DIY route, and over the last 5 years I have started building my own equipment and with my engineering background I guess it was inevitable that it would happen.
My current quest is trying to find some speakers that will outperform the Acoustic Energy AE2 that are currently the cornerstone of my system. They’ve been with me for 12 years now, and after trying numerous different speakers in their place nothing has bettered them in my listening room yet…
So, in search of better speakers I am about to embark on my most ambitious DIY project to date—to build a set of speakers. They’ll be active, which means they have no passive crossover inside. Instead I will be using a DSP which will not only allow me far greater control of the crossover parameters but also allow room correction if I need it. It also means that every driver in them will have a separate (external) amplifier. I don’t want to give too much away at this stage; more detail will come in an upcoming series of features as I progress through the project.
I guess this wouldn’t be complete without letting you know what my current kit is:
Amplification:
Pre – VTA SP12 (line)/PH12 (phono) – tube based (4x 12AU7, 2×6922) home built
Power – ESP P101 – MOSFET, 150wpc@8 ohm, 0.017% THD, home built
Speakers:
Acoustic Energy AE2 mounted on AE reference stands
BK Electronics XXLS400 Subwoofer (mainly used for AV)
Analogue sources:
Roksan Radius TT, modified (by me) Rega RB250 arm, Ortofon 2M Black cart, carbon-fiber mat.
Digital Sources:
Roksan K2 CD player
Sonos Connect streaming from: WD NAS (all FLAC files), Tidal hi-fi and Spotify
AV/Surround:
Marantz NR1504 DSP
AE Aegis centre speaker, Mission M71 rears
DIY Active Crossover Speakers – Thor
I’ve undertaken a few DIY hi-fi projects over the past 10 years. Whether it’s been fixing commercial equipment, upgrading old kit for friends or even building my own it’s been a voyage of discovery and all in the pursuit of sonic improvements.
 After completing my last project (a 150wpc MOSFET stereo power amp) I needed another challenge. The one piece of my system which has been with me the longest is the speakers. I’ve just never been able to find a set that really improved on the Acoustic Energy AE2’s, and it’s not for want of trying either.
So after hearing the relative successful improvements from my other DIY projects I decided to turn my attention to speakers. By all accounts a bit of a ‘black art’; the one thing that people say you shouldn’t do, unless you buy a kit.
I previously mentioned that I have both engineering and design background, so it’s probably no surprise that I thought I could probably give this a go. Irrespective of the results, here’s the place to follow it; whatever the outcome, good or bad!
First things first a bit of a spec sheet/wish list, call it what you like, there were a few things I want to achieve with these:
· Active crossover (more on this next)
· Floor standing
· Simple design
· 20-20kHz frequency response
· Eliminate the need for a separate subwoofer in my system
With that in mind; let’s move on to the more technical bit and take a very quick look at the difference between an active and passive crossover.
What’s active actually mean?
You might have come across the term ‘active’ speakers before, often referring to speakers with built-in amplifiers, but that’s not what I am building here. I am building speakers that use an active crossover. To explain that, I first ought to start with what most hi-fi people are familiar with, and that’s the passive crossover.
Passive crossovers:
A passive crossover is probably what your speakers in your system have inside them. Irrespective of whether they can be bi/tri/quad wired or whatever, they will probably have some inductors, capacitors and resistors inside which splits the incoming amplified signal between the different drivers. The purpose is so that each driver only receives the part of the signal that it can reproduce properly. In a simple 2-way speaker this means that the tweeter probably sees everything 2.5kHz and higher and the bass/woofer gets the rest.
The diagram below is an excellent representation of a typical passive crossover inside a speaker enclosure.

Image courtesy of www.minidsp.com
Benefits of a passive:
· Simple – one amp per channel, one set of cables
· Plug and play – anyone can do it and the results are good or bad depending on the equipment you have partnered with.
Disadvantages of passive:
· There are significant losses and inefficiencies in the components of the crossover, increasing amplifier load and adding noise and ultimately resulting in a higher amplifier output required for a specific SPL.
· Drivers vary significantly in impedance throughout the frequency range, so the performance of the crossover is dynamic.
· The crossover acts like a ‘buffer’ between the amplifier and driver reducing the ability of the amplifier to control the driver.
· Crossover properties vary with temperature and power, which results in non-linear response.
As you can see there are a number of disadvantages to a passive crossover; however that’s not to suggest that they cannot perform very well indeed.
So what’s active then?
An active crossover sits between the output of the pre-amplifier and the power amplifier—meaning that the signal is split at line level rather than at high power inside the speakers. There are a reasonable number of manufacturers offering this as an option. Linn is one of the main proponents of this system, but it’s starting to be adopted by other manufacturers too. It’s also growing in popularity with the DIY crowd.
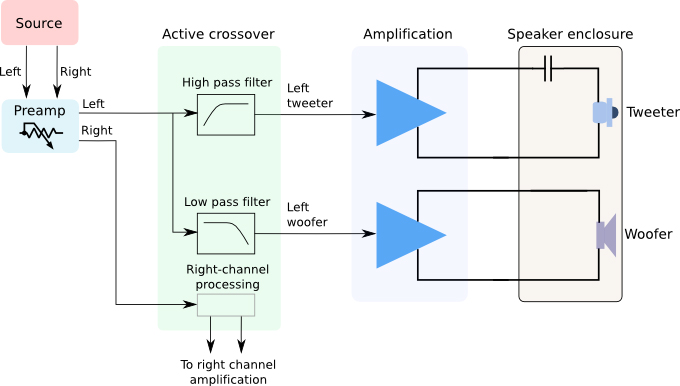
(Image courtesy of www.minidsp.com)
Like passive, it’s not all smooth sailing and there are both advantages and disadvantages to active as well.
Advantages of active:
· Each driver is directly driven by its own amplifier channel.
· Each amplifier has only to deal with a specific frequency range.
· Easier impedance load on the amplifier
· The crossover works at line level so the lower power signal is much easier and more efficient to separate into different frequencies.
· Reduced harmonic and intermodular distortion
· By using a Digital Signal Processor (DSP) it’s possible to carry out room opitmisation/equalization and therefore obtain a much flatter frequency response.
Disadvantages of active:
· Every driver needs its own amplifier channel, which is more expensive and more complex.
· There is more setup involved, especially if you choose to carry out room optimization.
Thor
Back to the project at hand then, firstly the name: Thor. Norse god of thunder and famous for wielding a large hammer. This seemed only apt as part of the intention with this project is to build some speakers that are able to plumb the depths of bass that many of us love (especially me with my love of heavy rock and gothic EBM). But they need to be able to maintain a nice flat frequency response through the mids and all the way up to the upper limits of the treble range. After all this is hi-fi and accurate reproduction of the recording is what I am ultimately interested in.
The first stage is to decide on 2 things: set a budget and then from that point choose some drivers. For this particular project I’ve decided the budget will be around the £1,000/$1,250 mark. That will include building the cabinets, drivers, DSP, extra amplification, and any other associated stuff that I need.
With that in mind choosing drivers is a fundamental part of the process and can ultimately make or break a design. Until they are chosen and their specifications and parameters known, it’s not possible to calculate cabinet volumes and therefore actually design anything.
I chose drivers from SB Acoustics (http://www.sbacoustics.com/) after reading a number of excellent reviews and checking availability in the UK. The specific drivers I have chosen are:
Tweeters: SB26STAC-C000-4
Mid-range: 7½” SATORI MW19P-8
Bass: 12″ SB34NRXL75-8
Now, I can hear a few cries of “what are you doing, 12” bass drivers, you’re mad!” well, you would be correct on the mad part, but there are reasons why and that will become apparent soon enough.
These drivers were chosen specifically to offer overlapping, flat frequency response at very close SPL’s on the industry standard tests. This should mean I have the potential to achieve something close to that perfect flat 20-20kHz frequency response that I want.
With the drivers chosen I was able to move on to calculating the enclosure sizes, for this I like to use any of the plethora of online calculators, but don’t forget you need to compensate for the volume that the driver itself takes up.
One of the key choices was whether to use sealed or vented enclosures. I chose to take the sealed route, mainly because it’s far simpler to predict the behavior of the driver. With the chosen drivers I don’t really need to amplify a specific frequency range, and sealed cabinets typically offer much tighter bass control in comparison to vented. Besides, if it’s good enough for some of the best speaker designers/manufacturers in the world, it’s good enough for me. The final reason is that sealed enclosures are much smaller than vented for the same performance.
The enclosures:
There are lots of factors that come into play when it comes to designing speaker enclosures, and to be honest you never really know what they will sound like until you actually have them built and test them. But there are a few simple rules that will help from the start.
· They need to be solid—any flex or resonance/vibration in the cabinet will color the sound at that particular frequency.
· Man made boards are good, sure solid wood looks nice, but manmade boards are consistent in their properties, are unidirectional, and often have superior damping properties to solid wood.
· The volume of the enclosure needs to suit the drivers. Trust the manufacturers specifications here, don’t go with what ‘looks’ right.
· Avoid square boxes—if you want to set up standing waves they are great, but a bad idea in speaker design
With those thoughts lingering, let’s take a look at what I’ve come up with so far at this early stage in the project. My drawings are all done in Solidworks 2015.
The cabinet itself is constructed from 1” birch ply; this is available in a variety of grades, it’s very stiff (better than MDF) and easy to work with. It’s also very stable. 1” MDF would be a fine substitute here, and has slightly better damping properties than ply, but it’s not as dense. The whole cabinet will be glued and screwed together.
The internal volumes for each driver are defined by the internal bracing. The tweeter is isolated from the other drivers, even though the one I have chosen has a sealed back, adding the extra volume in the top section of the enclosure would have made the volume for the mid driver too large.
There is extra bracing on the side wall opposite the bass driver; this is a relatively large surface area panel, so the extra stiffening will help to stop it from resonating at low frequencies.
Overall dimensions are:
· 1025mm (40.35”) tall
· 250mm (9.8”) wide (330mm (13”) including base)
· 452mm (17.8”) deep (532mm (20.9”) including base)
· 30kg (66lb) weight excluding drivers
Side-firing bass drivers is one thing I decided on quite early and there are a number of reasons for this, but it was aimed mainly at reducing the overall width of the front of the cabinet to provide improved imaging and less diffraction. It’s a compromise that I was willing to take, especially since the operating range of these drivers will be below the frequency at which sound is directional (under 100Hz, anyway). There are also some benefits because cross-firing drivers in a push-push configuration actually offer some benefits that I will deal with in my next article.
Below are a few preliminary cabinet illustrations:
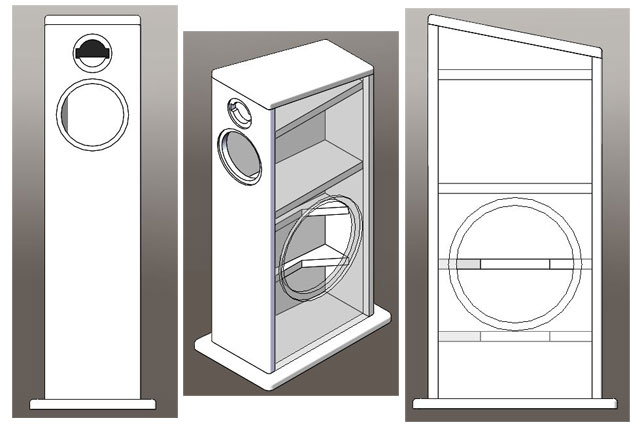
The conceptual design is complete at this stage and I am now in the process of collecting parts to make it all happen. So watch Sera’s Space for more….! 
Stereo Times Masthead
Publisher/Founder
Clement Perry
Editor
Dave Thomas
Senior Editors
Frank Alles, Mike Girardi, Russell Lichter, Terry London, Moreno Mitchell, Paul Szabady, Bill Wells, Mike Wright, and Stephen Yan,
Current Contributors
David Abramson, Tim Barrall, Dave Allison, Ron Cook, Lewis Dardick, John Hoffman, Dan Secula, Don Shaulis, Greg Simmons, Eric Teh, Greg Voth, Richard Willie, Ed Van Winkle, Rob Dockery, Richard Doron, and Daveed Turek
Site Management Clement Perry
Ad Designer: Martin Perry





Be the first to comment on: Sera’s Space